Wednesday 29 June 2011

Remove Msiexec.exe Trojan (Uninstall Guide)

In the last few weeks we've heard numerous cases of people getting User Account Control (UAC) notifications asking them to allow msiexec.exe tu run. When we got the first e-mail, we thought that the user is experiencing system error but after quite a bit of research we found out that it was a Trojan horse masquerading as msiexec.exe. The Trojan was located in Users directory: C:\Users\[UserName]\msiexec.exe.
User Account Control
Do you want to allow the following program from an
unknown publisher to make changes to this computer?
Program name: msiexec.exe
Publisher: Unknown
File origin: Hard drive on this computer


The legitimate msiexec.exe program that interprets packages and installs products is located in C:\Windows\System32 folder. But the problem is that cyber criminals try to avoid antivirus detections and confuse users by giving a malicious program the same name of some other legit programs. And when you do a Google search on the word 'msiexec.exe', you're presented with a list of results saying that it's a legitimate Windows program. In this case, the file location of the malicious msiexec.exe program (C:\Users\[UserName]\msiexec.exe) clearly indicates that it pretends to be something it's not. You can upload suspicious files to VirusTotal or Jotti to see if your suspicions were correct.

The malicious msiexec.exe downloads additional malware onto your computer. Even if you delete it manually, it may reappear after you reboot your computer. That's why we strongly recommend you to scan your computer with anti-malware software.

Download recommended anti-malware software (Spyware Doctor) and run a full system scan to remove this virus from your computer.

NOTE: in some cases the rogue program may block anti-malware software. Before saving the selected program onto your computer, you may have to rename the installer to iexplore.exe or winlogon.exe With all of these tools, if running Windows 7 or Vista they MUST be run as administrator. Launch the program and follow the prompts. Don't forget to update the installed program before scanning.

Important! Do not delete the legitimate msiexec.exe located in C:\Windows\System32 folder.

If you need help removing the msiexec.exe Trojan horse, please a comment below. Good luck and be safe online!


Associated Msiexec.exe files and registry values:

Files:
  • C:\Windows\System32\strmdll32.dll
  • C:\Windows\System32\mycomput32.exe
  • C:\Windows\System32\SYSTEM32\55274-640-2001945-237251270C.manifest
  • C:\Windows\System32\SYSTEM32\55274-640-2001945-237251270S.manifest
  • C:\Windows\System32WINDIR%\SYSTEM32\avicap3232.dll
  • C:\Windows\System32\SYSTEM32\55274-640-2001945-237251270P.manifest
  • C:\Windows\System32\SYSTEM32\248321536
  • C:\Windows\System32\SYSTEM32\msorcl3232.exe
  • %Temp%\WER11.tmp
  • %Temp%\2BA98D.dmp
%Temp% refers to:
C:\Documents and Settings\[UserName]\Local Settings\Temp (in Windows 2000/XP)
C:\Users\[UserName]\AppData\Local\Temp (in Windows Vista & Windows 7)
  • HKEY_CURRENT_USER\SOFTWARE\
  • HKEY_CURRENT_USER\SOFTWARE\IVEDHGVTFU\
  • HKEY_CURRENT_USER\SOFTWARE\IVEDHGVTFU\CLSID\
  • HKEY_LOCAL_MACHINE\SOFTWARE\CLASSES\.FSHARPROJ\
  • HKEY_LOCAL_MACHINE\SOFTWARE\CLASSES\.FSHARPROJ\PERSISTENTHANDLER\
  • HKEY_LOCAL_MACHINE\SOFTWARE\CLASSES\CLSID\{167D8C11-D0F7-4D4A-94FF-1B727D3CFC51}\
  • HKEY_LOCAL_MACHINE\SOFTWARE\CLASSES\CLSID\{167D8C11-D0F7-4D4A-94FF-1B727D3CFC51}\INPROCSERVER32\
  • HKEY_LOCAL_MACHINE\SOFTWARE\CLASSES\CLSID\{53FBF74C-ACD3-8E42-3397-A342CEE0B972}\
  • HKEY_LOCAL_MACHINE\SOFTWARE\CLASSES\CLSID\{53FBF74C-ACD3-8E42-3397-A342CEE0B972}\INPROCSERVER32\
  • HKEY_LOCAL_MACHINE\SOFTWARE\CLASSES\CLSID\{CA80A1DF-1993-458D-B1C5-8893EC9E5770}\
  • HKEY_LOCAL_MACHINE\SOFTWARE\CLASSES\IVEDHGVTFU\
  • HKEY_LOCAL_MACHINE\SOFTWARE\CLASSES\IVEDHGVTFU\CLSID\
  • HKEY_LOCAL_MACHINE\SOFTWARE\MICROSOFT\WINDOWS\CURRENTVERSION\EXPLORER\BROWSER HELPER OBJECTS\{167D8C11-D0F7-4D4A-94FF-1B727D3CFC51}\
  • HKEY_LOCAL_MACHINE\SOFTWARE\MICROSOFT\WINDOWS\CURRENTVERSION\EXPLORER\BROWSER HELPER OBJECTS\{53FBF74C-ACD3-8E42-3397-A342CEE0B972}\
  • HKEY_USERS\.DEFAULT\SOFTWARE\IVEDHGVTFU\
  • HKEY_USERS\.DEFAULT\SOFTWARE\IVEDHGVTFU\CLSID\
Share the knowledge:

Tuesday 28 June 2011

Remove Android.Ggtracker (Uninstall Guide)

Android.Ggtracker is a Trojan horse for Android devices that may send SMS messages to premium-rate numbers without your knowledge and consent. It is distributed through the use of malicious webpages that usually imitate the Android Market website. The malicious website may trick you into installing some sort of battery saving application, e.g., t4t.pwower.management or even a porn app packaged as com.space.sexypic. Android.Ggtracker is available for download from alternate Android markets too. It targets users in the United States. The Trojan sends your phone number to predefined location and completes the sign-up procedure to SMS subscription services automatically in the background. It also intercepts SMS messages from certain numbers. Android.Ggtracker may gather certain information about your Android device and send it to predefined location.

The Trojan may collect the following information:
  • Device phone number
  • Version of the Android operating system
  • Name of the network operator
  • Sender and body of intercepted SMS messages
  • Sender and body of SMS messages in the Inbox
If you have recently installed applications that were packed as t4t.pwower.management and com.space.sexypic or you suspect that your Android device is infected by this Trojan, please follow the removal instructions below. Good luck and be safe online!


Android.Ggtracker manual removal guide:

1. Open the Google Android Menu.
2. Go to the Settings icon and select Applications.
3. Next, click Manage.
4. Select the application and click the Uninstall button.

Additionally, you should scan your device with mobile antivirus software. All major antivirus software vendors offer Mobile Security products.
Share the knowledge:

Remove QuestScan (Uninstall Guide)

QuestScan is defined as adware by some anti-virus software applications (Avira, AVG, Ikarus). It is bundled with Hotbar and other free software. We were unable to find a traditional setup executable of Quest Scan. Whenever you are searching for any keyword on the address bar of your web browser it is redirected to questscan.com search engine instead of searching for results in the Google or any other default search engine. It displays very limited and commercial results most of the time. Many users will likely find this a confusing experience because QuestScan changes the way you search the web. Besides, many users don't even know what QuestScan is. That's usually because only a small number of users will actually read the EULA or they will not fully understand they are consenting to the installation of advertising software. On the other hand, there's a great chance that such information is not always clearly presented. So, it is suggested to always look upon the files you are installing in your computer. Another problem is that some users find it difficult to remove QuestScan. If you are facing this problem with your web browser, please follow the steps in the removal guide below to remove QuestScan from your compute completely. If you have any further questions or concerns, please leave a comment below. Good luck and be safe online!


QuestScan removal instructions:

1. First of all, download recommended anti-malware software and run a full system scan. It will detect and remove this infection from your computer. You may then follow the manual removal instructions below to remove the leftover traces of this browser hijacker. Hopefully you won't have to do that.


2. Go to the Start Menu. Select Control PanelAdd/Remove Programs.
If you are using Windows Vista or Windows 7, select Control PanelUninstall a Program.


3. Search for QuestScan in the list. Select the program and click Remove button.
If you are using Windows Vista/7, click Uninstall up near the top of that window.


Alternate removal: run C:\Program Files\QuestScan\uninstall.exe

4. Scan your computer with anti-malware software to remove the leftovers of this adware from your computer.

It's possible that an infection is blocking anti-malware software from properly installing. Before saving the selected program onto your computer, you may have to rename the installer to iexplore.exe or winlogon.exe. Don't forget to update the installed program before scanning.


Remove QuestScan in Internet Explorer:

1. Open Internet Explorer. Go to ToolsManage Add-ons.


2. Select Search Providers. Select QuestScan and click Remove button to remove it.


Remove QuestScan in Mozilla Firefox:

1. Open Mozilla Firefox. Go to ToolsAdd-ons.


2. Select Extensions. Choose QuestScan Toolbar and click Uninstall button.


Associated QuestScan files and registry values:

Files:
  • C:\Program Files\QuestScan\QuestScan_deleted_
  • C:\Program Files\QuestScan\questscan.dll
  • C:\Program Files\QuestScan\questscan.exe
  • C:\Program Files\QuestScan\uninstall.exe
  • C:\Documents and Settings\All Users\Application Data\QuestScan\questscan143.exe
Registry values:
  • HKEY_LOCAL_MACHINE\SOFTWARE\Microsoft\Windows\CurrentVersion\App Management\ARPCache\QuestScan
  • HKEY_LOCAL_MACHINE\SOFTWARE\Microsoft\Windows\CurrentVersion\Uninstall\QuestScan
  • HKEY_LOCAL_MACHINE\SOFTWARE\QuestScan
  • HKEY_LOCAL_MACHINE\SYSTEM\ControlSet001\Services\QuestScan Service
Share the knowledge:

Wednesday 22 June 2011

Remove Android.Tonclank (Uninstall Guide)

Android.Tonclank is a Trojan horse that steals information from compromised Android devices. It may open a backdoor and accept commands to perform additional actions on the phone. It gathers basic information about the phone: Device ID and Device permissions. It then sends this information to predefined locations. Android.Tonclank is also capable of performing the following actions:
  • copy all of the bookmarks on the device
  • copy all of the history on the device
  • copy all of the shortcuts on the device
  • create a log of all of the activities performed on the device
  • modify the browser's home page
  • return the status of the last executed command
Android.Tonclank must be manually installed and it may be available for download in the Android MarketPlace as and application called Favorite Games Backup. It runs malicious code in the background and downloads additional a .jar file from the internet. If you suspect or confirm that your device has been affected by Android.Tonclank or you have recently installed an application called Favorite Games Backup, please follow the removal instructions below. Good luck and be safe online!


Android.Tonclank manual removal guide:

1. Open the Google Android Menu.
2. Go to the Settings icon and select Applications.
3. Next, click Manage.
4. Select the application and click the Uninstall button.

Additionally, you should scan your device with mobile antivirus software. All major antivirus software vendors offer Mobile Security products.
Share the knowledge:

Remove Android.Lightdd (Uninstall Guide)

Android.Lightdd is a Trojan horse that monitors the phone and sends certain information about your device to predefined locations. This Trojan horse runs in the background and gathers information when certain actions occur on the phone. Android.Lightdd registers the following services:
  • com.passionteam.lightdd.Receiver
  • com.passionteam.lightdd.CoreService
What is more, Android.Lightdd may trick you into downloading Trojanized apps from unofficial Android Markets. Here's a list of apps that were distributing Android.Lightdd malware. Please note that some of these malicious apps might be still available for download at unofficial Android Markets.
  • Beauty Breasts
  • Call End Vibrate
  • Floating Image Free
  • HOT Girls 1
  • HOT Girls 2
  • HOT Girls 3
  • HOT Girls 4
  • Paint Master
  • Quick Photo Grid
  • Quick SMS Backup
  • Quick Uninstaller
  • Sex Sound
  • Sex Sound: Japanese
  • Sexy Girls: Hot Japanese
  • Sexy Legs
  • Super App Manager
  • Super Color Flashlight
  • Super Photo Enhance
  • Super StopWatch and Timer
  • System Monitor
  • Volume Manager
If you suspect or confirm that your device has been affected by Android.Lightdd, please follow the removal instructions below. Good luck and be safe online!


Android.Lightdd manual removal guide:

1. Open the Google Android Menu.
2. Go to the Settings icon and select Applications.
3. Next, click Manage.
4. Select the application and click the Uninstall button.

Additionally, you should scan your device with mobile antivirus software. All major antivirus software vendors offer Mobile Security products.
Share the knowledge:

Tuesday 21 June 2011

Remove METROPOLITAN POLICE Ransomware (Uninstall Guide)

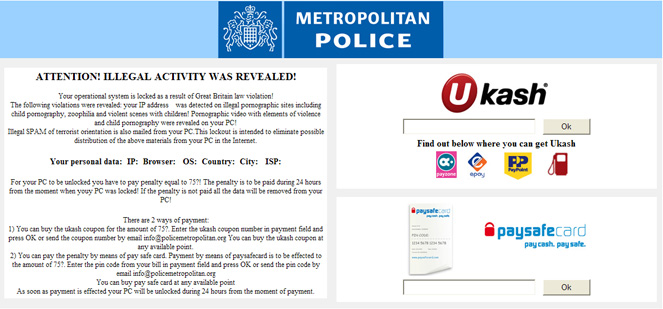
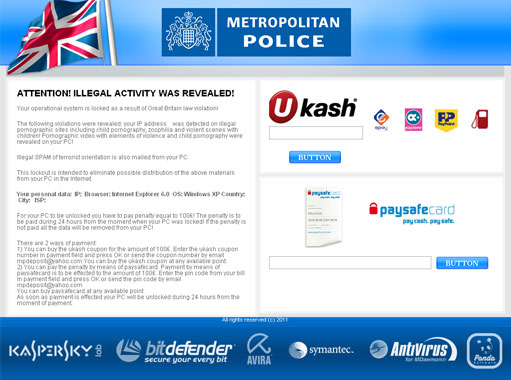
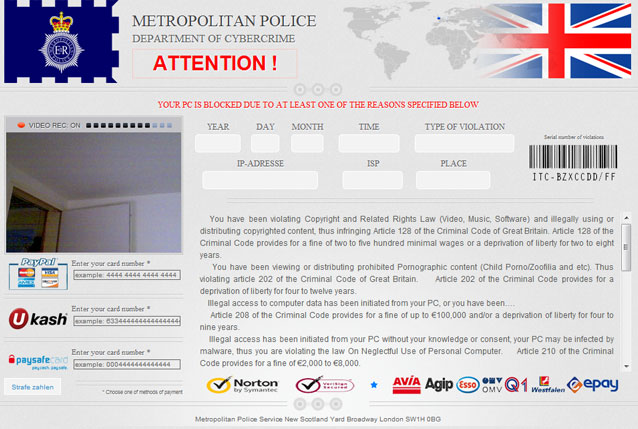
"METROPOLITAN POLICE" Attention! Illegal activity was revealed! is a ransomware-based malware that demands you to pay up in order to regain control of your computer. About a month ago, we wrote about ransomware that replaces the Windows desktop with a fake warning from the German Federal Police (BUNDESPOLIZEI). Apparently cybercrooks are moving to Great Britain. As we wrote previously, if your computer is infected with ransomware, you will notice the difference right away. Your Desktop will be taken over by a scam notice headed METROPOLITAN POLICE. It will stop you from accessing your files, programs and system tools. Even if you start your machine in Safe Mode or Safe Mode with Networking you'll get the same issue. The trojan claims that you were watching illegal pornographic websites and states that if you don't pay £75 in 24 hours then your computer will be wiped clean. Don't worry, the Trojan is not capable of doing this. On the other hand, no one would really want to run the risk of losing important files or family photos so there is a great chance that someone will actually fall victim to scam artists behind the Metropolitan Police malware. To remove the METROPOLITAN POLICE ransomware from your computer, please follow the steps in the removal guide below. Good luck and be safe online!


Method 1: Metropolitan Police virus removal instructions using System Restore in Safe Mode with Command Prompt:

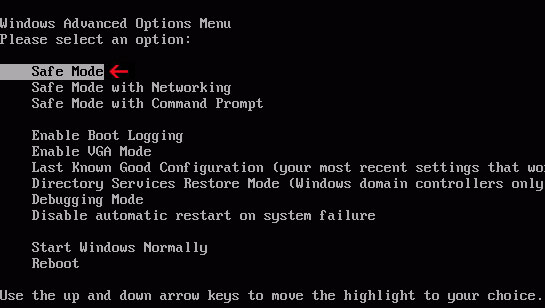
1. Unplug your network cable and manually turn your computer off. Reboot your computer is "Safe Mode with Command Prompt". As the computer is booting tap the "F8 key" continuously which should bring up the "Windows Advanced Options Menu" as shown below. Use your arrow keys to move to "Safe Mode with Command Prompt" and press Enter key.


2. Make sure you log in to an account with administrative privileges (login as admin).

3. Once the Command Prompt appears you have few seconds to type in explorer and hit Enter. If you fail to do it within 2-3 seconds, the Metropolitan Police ransomware will take over and will not let you type anymore.

4. If you managed to bring up Windows Explorer you can now browse into:
  • Win XP: C:\windows\system32\restore\rstrui.exe and press Enter
  • Win Vista/Seven: C:\windows\system32\rstrui.exe and press Enter
5. Follow the steps to restore your computer into an earlier day.

6. Download recommended anti-malware software (direct download) and run a full system scan to remove the remnants of Metropolitan Police virus.


Method 2: Metropolitan Police virus removal instructions using System Restore in Safe Mode:

1. Power off and restart your computer. As the computer is booting tap the "F8 key" continuously which should bring up the "Windows Advanced Options Menu" as shown below. Use your arrow keys to move to "Safe Mode" and press Enter key.


NOTE: Login as the same user you were previously logged in with in the normal Windows mode.

2. Once in there, go to Start menu and search for "system restore". Or you can browse into the Windows Restore folder and run System Restore utility from there:
  • Win XP: C:\windows\system32\restore\rstrui.exe double-click or press Enter
  • Win Vista/7/8: C:\windows\system32\rstrui.exe double-click or press Enter
3. Select Restore to an earlier time or Restore system files... and continue until you get into the System Restore utility.

4. Select a restore point from well before the Metropolitan Police virus appeared, two weeks should be enough.

5. Restore it. Please note, it can take a long time, so be patient.

6. Once restored, restart your computer and hopefully this time you will be able to login (Start Windows normally).

7. At this point, download recommended anti-malware software (direct download) and run a full system scan to remove the Metropolitan Police virus.


Method 3: Metropolitan Police virus removal instructions using MSConfig in Safe Mode:

1. Power off and restart your computer. As the computer is booting tap the "F8 key" continuously which should bring up the "Windows Advanced Options Menu" as shown below. Use your arrow keys to move to "Safe Mode" and press Enter key.


NOTE: Login as the same user you were previously logged in with in the normal Windows mode.

2. Once in there, go to Start menu and search for "msconfig". Launch the application. If you're using Windows XP, go to Start then select Run.... Type in "msconfig" and click OK.

3. Select Startup tab. Expand Command column and look for a startup entry that launches randomly named file from %AppData% or %Temp% folders using rundll32.exe. See example below:

C:\Windows\System32\rundll32.exe C:\Users\username\appdata\local\temp\regepqzf.dll,H1N1

4. Disable the malicious entry and click OK to save changes.

5. Restart your computer. This time Start Windows normally. Hopefully, you won't be prompted with a fake Metropolitan Police screen.

6. Finally, download recommended anti-malware software (direct download) and run a full system scan to remove the Metropolitan Police virus.


Method 4: Metropolitan Police malware removal instructions in Safe Mode with Command Prompt (requires registry editing):

1. Reboot your computer is "Safe Mode with Command Prompt". As the computer is booting tap the "F8 key" continuously which should bring up the "Windows Advanced Options Menu" as shown below. Use your arrow keys to move to "Safe Mode with Command Prompt" and press Enter key. Login as the same user you were previously logged in with in the normal Windows mode.


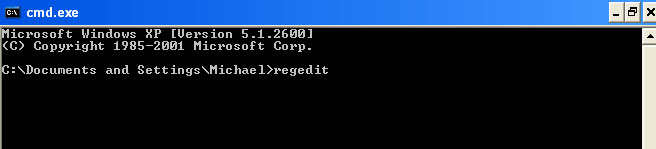
2. When Windows loads, the Windows command prompt will show up as show in the image below. At the command prompt, type explorer, and press Enter. Windows Explorer opens. Do not close it.


3. Then open the Registry editor using the same Windows command prompt. Type regedit and press Enter. The Registry Editor opens.


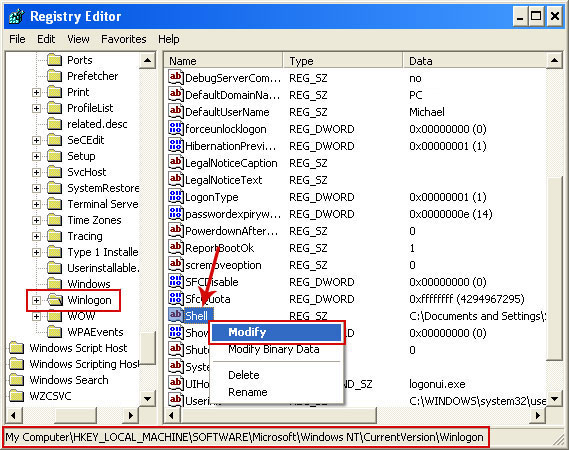
4. Locate the following registry entry:

HKEY_LOCAL_MACHINE\SOFTWARE\Microsoft\Windows NT\CurrentVersion\Winlogon\

In the righthand pane select the registry key named Shell. Right click on this registry key and choose Modify.


Default value is Explorer.exe.


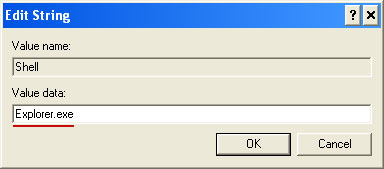
Modified value data points to Trojan Ransomware executable file.


Please copy the location of the executable file it points to into Notepad or otherwise note it and then change value data to Explorer.exe. Click OK to save your changes and exit the Registry editor.

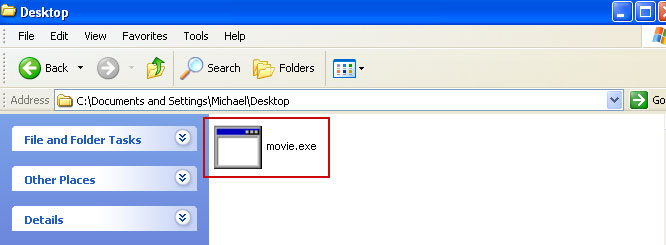
5. Remove the malicous file. Use the file location you saved into Notepad or otherwise noted in step in previous step. In our case, "Metropolitan Police" was run from the Desktop. There was a file called movie.exe.

Full path: C:\Documents and Settings\Michael\Desktop\movie.exe
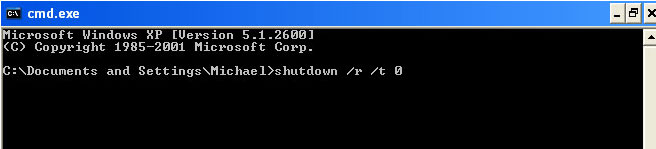


Go back into "Normal Mode". To restart your computer, at the command prompt, type shutdown /r /t 0 and press Enter.


6. Download recommended anti-malware software (direct download) and run a full system scan to remove the leftovers of this virus from your computer. That's it!


Method 5: Metropolitan Police virus removal using Kaspersky Rescue Disk:

1. Download the Kaspersky Rescue Disk iso image from the Kaspersky Lab server. (Direct download link)
Please note that this is a large downloaded, so please be patient while it downloads.

2. Record the Kaspersky Rescue Disk iso image to a CD/DVD. You can use any CD/DVD record software you like. If you don't have any, please download and install ImgBurn. Small download, great software. You won't regret it, we promise.

For demonstration purposes we will use ImgBurn.

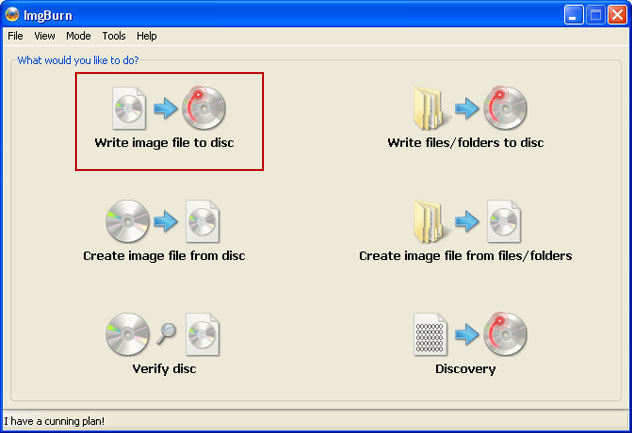
So, open up ImgBurn and choose Write image file to disc.


Click on the small Browse for file icon as show in the image. Browse into your download folder and select kav_rescue_10.iso as your source file.


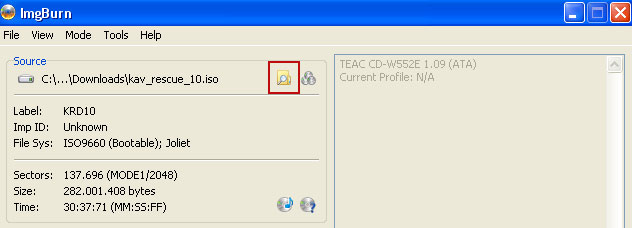
OK, so know we are ready to burn the .iso file. Simply click the Write image file to disc button below and after a few minutes you will have a bootable Kaspersky Rescue Disk 10.


3. Configure your computer to boot from CD/DVD. Use the Delete or F2, F11 keys, to load the BIOS menu. Normally, the information how to enter the BIOS menu is displayed on the screen at the start of the OS boot.


The keys F1, F8, F10, F12 might be used for some motherboards, as well as the following key combinations:
  • Ctrl+Esc
  • Ctrl+Ins
  • Ctrl+Alt
  • Ctrl+Alt+Esc
  • Ctrl+Alt+Enter
  • Ctrl+Alt+Del
  • Ctrl+Alt+Ins
  • Ctrl+Alt+S
If you can enter Boot Menu directly then simply select your CD/DVD-ROM as your 1st boot device.

If you can't enter Boot Menu directly then simply use Delete key to enter BIOS menu. Select Boot from the main BIOS menu and then select Boot Device Priority.


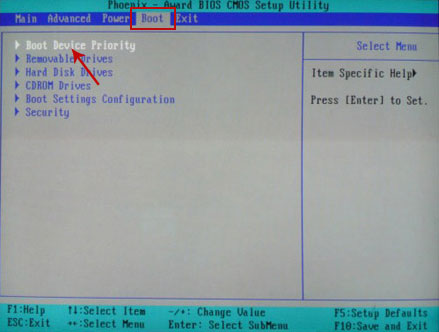
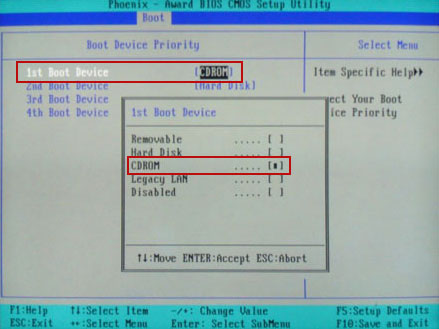
Set CD/DVD-ROM as your 1st Boot Device. Save changes and exist BIOS menu.


4. Let's boot your computer from Kaspersky Rescue Disk.

Restart your computer. After restart, a message will appear on the screen: Press any key to enter the menu. So, press Enter or any other key to load the Kaspersky Rescue Disk.


5. Select your language and press Enter to continue.


6. Press 1 to accept the End User License Agreement.
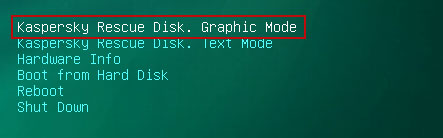


7. Select Kaspersky Rescue Disk. Graphic Mode as your startup method. Press Enter. Once the actions described above have been performed, the operating system starts.
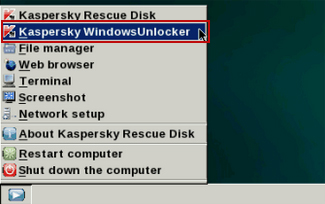


8. Click on the Start button located in the left bottom corner of the screen. Run Kaspersky WindowsUnlocker to remove Windows system and registry changes made by Metropolitan Police Virus. It won't take very long.


9. Click on the Start button once again and fire up the Kaspersky Rescue Disk utility. First, select 
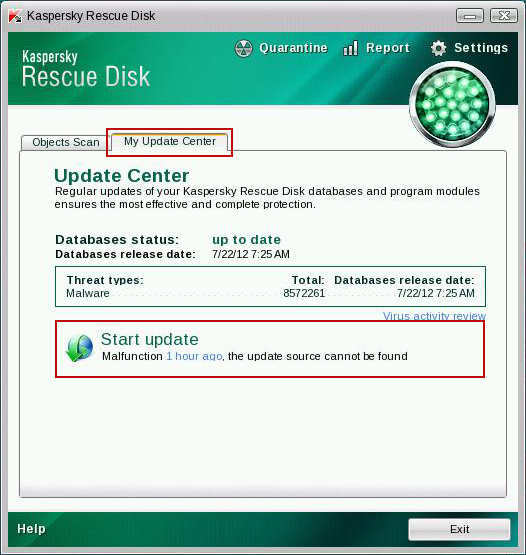
My Update Center tab and press Start update to get the latest malware definitions. Don't worry if you can't download the updates. Just proceed to the next step.
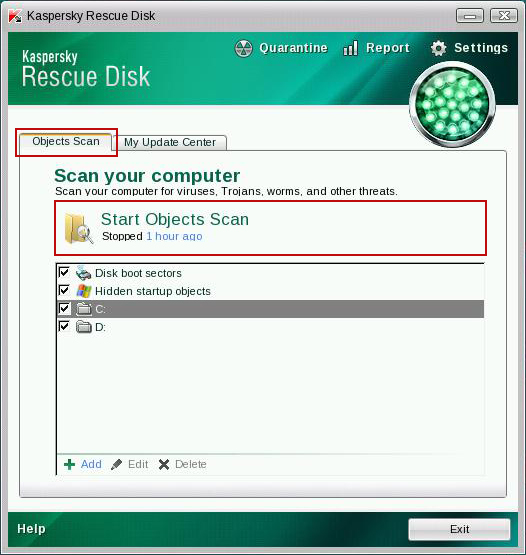


10. Select Object Scan tab. Place a check mark next to your local drive C:\. If you have two or more local drives make sure to check those as well. Then click Start Objects Scan to scan your computer for malicious software.
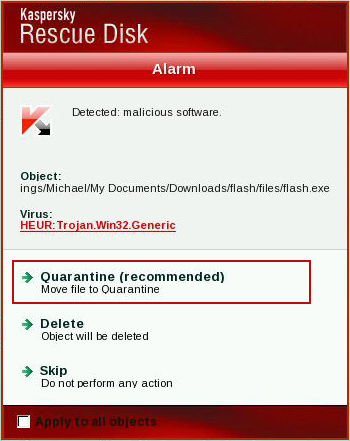


11. Quarantine (recommended) or delete every piece of malicious code detected during the system scan.


12. You can now close the Kaspersky Rescue Disk utility. Click on the Start button and select Restart computer.


13. Please restart your computer into the normal Windows mode. Download recommended anti-malware software (direct download) and run a full system scan to remove the remnants of Metropolitan Police virus and to protect your computer against these types of threats in the future.


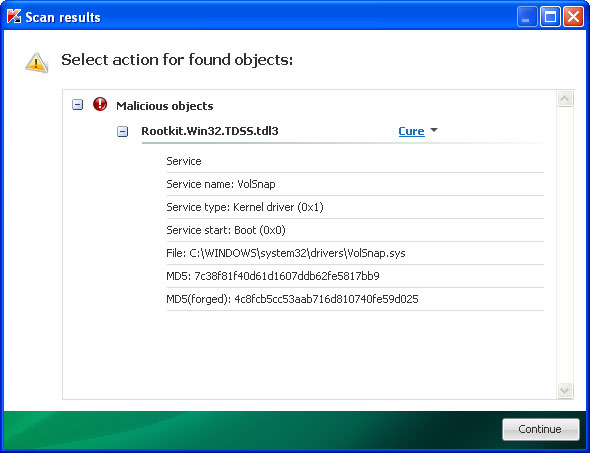
Associated Metropolitan Police malware files and registry values:

Files:
  • [SET OF RANDOM CHARACTERS].exe
Registry values:
  • HKEY_LOCAL_MACHINE\SOFTWARE\Microsoft\Windows NT\CurrentVersion\Winlogon\"Shell" = "[SET OF RANDOM CHARACTERS].exe"
Share this information with other people:

Friday 17 June 2011

Remove Windows XP Repair (Uninstall Guide)

Windows XP Repair is a fake system optimization and repair tool that tries to trick users into paying for a version of the program to fix fictitious registry errors and non-existent hard drive problems. It's a rebranded version of Windows XP Restore and Windows XP Recovery scareware. And it's also worth mentioning that if you have a computer running Windows XP then the rogue program will install itself as Windows XP Repair. But if you are running Windows Vista or Windows 7 then the rogue program will install itself as Windows Vista Repair or Windows 7 Repair. In other words, this fake application can change its name and graphical user interface depending on the version of Windows that is running.


There are a number of ways that Windows XP Repair gets on your computer, but probably the most common is through fake online virus scanners and infected websites. Usually, fake virus scanners attempt to scare users into downloading fake malware removal tools to remove non-existent viruses. However, it may enter your computer without your knowledge when you visit a compromised website. Drive-by-downloads are very popular and cyber crooks try to use this method of malware distribution as often as they can.

If you suspect or confirm that your computer is infected with Windows XP Repair then you should remove it as soon as possible. To remove Windows XP Repair and related malware from your computer, please follow the steps in the removal guide below. Or you can contact the guys from KitRx Tech Services Blog to troubleshoot and fix problems caused by this malware. Please note that the following instructions are for users of Windows XP but they should work for those of you who use Windows Vista or Windows 7 too.

While running, Windows XP Repair will pretend to scan your computer for registry and hard drive errors. It will also display fake error warnings claiming that your RAM memory usage is critically high and that there is a critical hard drive failure which may cause data loss.


Windows XP Repair will block the Task Manager and hide your desktop icons, certain files and folders to make you think that your computer has some really serious problems. It doesn't delete your files!


You can remove Windows XP Repair manually but honestly this is not something that novice computer users may be able to deal with on their own. Instead of that, you should scan your computer with anti-malware software. Additionally, you can activate the rogue program by entering this registration code 8475082234984902023718742058948 and any email as shown in the image below.


Once this is done, you are free to install anti-malware software and remove the rogue anti-virus program from your computer properly. If you think you have accidentally installed Windows XP Repair, please follow the removal instructions below. And if you have any further questions, please leave a comment below. Good luck and be safe online!


Windows XP Repair removal instructions:

1. First of all, you need to unhide the files and folders. Select Run... from the Start Menu or just hit the key combination CTRL+R on your keyboard. In the Open: field, enter cmd and hit Enter or click OK.


At the command prompt, enter attrib -h /s /d and hit Enter. Now, you should see all your files and folders. NOTE: you may have to repeat this step because the malware may hide your files again.


If you still can't see any of your files, Select Run... from the Start Menu or just hit the key combination CTRL+R on your keyboard. In the Open: field, enter explorer and hit Enter or click OK.


2. Open Internet Explorer. Select Run... from the Start Menu or just hit the key combination CTRL+R on your keyboard. In the Open: field, enter iexplore.exe and hit Enter or click OK.

Download free anti-malware software from the list below and run a full system scan.
NOTE: in some cases the rogue program may block anti-malware software. Before saving the selected program onto your computer, you may have to rename the installer to iexplore.exe or winlogon.exe With all of these tools, if running Windows 7 or Vista they MUST be run as administrator. Launch the program and follow the prompts. Don't forget to update the installed program before scanning.

3. New threats appear every day. In order to protect your PC from such (new) infections we strongly recommend you to use ESET Smart Security.


Alertane Windows XP Repair removal instructions:

1. First of all, you need to unhide the files and folders. Select Run... from the Start Menu or just hit the key combination CTRL+R on your keyboard. In the Open: field, enter cmd and hit Enter or click OK.


At the command prompt, enter attrib -h /s /d and hit Enter. Now, you should see all your files and folders. NOTE: you may have to repeat this step because the malware may hide your files again.


2. The rogue application places an icon or your desktop. Right click on the icon, click Properties in the drop-down menu, then click the Shortcut tab.


The location of the malware is in the Target box.


On computers running Windows XP, malware hides in:
C:\Documents and Settings\All Users\Application Data\

NOTE: by default, Application Data folder is hidden. Malware files are hidden as well. To see hidden files and folders, please read Show Hidden Files and Folders in Windows.

Under the Hidden files and folders section, click Show hidden files and folders, and remove the checkmark from the checkbox labeled:

- Hide extensions for known file types
- Hide protected operating system files

Click OK to save the changes. Now you will be able to see all files and folders in the Application Data directory.

On computers running Windows Vista/7, malware hides in:
C:\ProgramData\

3. Look for suspect ".exe" files in the given directories depending on the Windows version you have.

Example Windows XP:
C:\Documents and Settings\All Users\Application Data\24436516.exe
C:\Documents and Settings\All Users\Application Data\jTNIGvyiwfxUlB.exe

Example Windows Vista/7:
C:\ProgramData\24436516.exe
C:\ProgramData\jTNIGvyiwfxUlB.exe

Basically, there will be a couple of ".exe" file named with a series of numbers or letters.


Rename those files to 24436516.vir, jTNIGvyiwfxUlB.vir etc. For example:


It should be: C:\Documents and Settings\All Users\Application Data\24436516.vir

Instead of: C:\Documents and Settings\All Users\Application Data\24436516.exe

4. Restart your computer. The malware should be inactive after the restart.

5. Open Internet Explorer and download TDSSKiller. This malware usually (but not always) comes bundled with TDSS rootkit. Removing this rootkit from your computer is very important (if exists). Run TDSSKiller and remove the rootkit.


6. Download free anti-malware software from the list below and run a full system scan.
NOTE: in some cases the rogue program may block anti-malware software. Before saving the selected program onto your computer, you may have to rename the installer to iexplore.exe or winlogon.exe With all of these tools, if running Windows 7 or Vista they MUST be run as administrator. Launch the program and follow the prompts. Don't forget to update the installed program before scanning.

7. New threats appear every day. In order to protect your PC from such (new) infections we strongly recommend you to use ESET Smart Security.


Associated Windows XP Repair files and registry values:

Files:

Windows XP:
  • %AllUsersProfile%\Application Data\[SET OF RANDOM CHARACTERS]
  • %AllUsersProfile%\Application Data\~[SET OF RANDOM CHARACTERS]
  • %UsersProfile%\Local Settings\Application Data\[SET OF RANDOM CHARACTERS].lic
  • %AllUsersProfile%\Application Data\[SET OF RANDOM CHARACTERS].dll
  • %AllUsersProfile%\Application Data\[SET OF RANDOM CHARACTERS].exe
  • %UsersProfile%\Desktop\Windows XP Repair.lnk
  • %UsersProfile%\Start Menu\Programs\Windows XP Repair\
  • %UsersProfile%\Start Menu\Programs\Windows XP Repair\Windows XP Repair.lnk
  • %UsersProfile%\Start Menu\Programs\Windows XP Repair\Uninstall Windows XP Repair.lnk
%AllUsersProfile% refers to: C:\Documents and Settings\All Users
%UserProfile% refers to: C:\Documents and Settings\[User Name]

Windows Vista/7:
  • %AllUsersProfile%\[SET OF RANDOM CHARACTERS]
  • %AllUsersProfile%\~[SET OF RANDOM CHARACTERS]
  • %AllUsersProfile%\[SET OF RANDOM CHARACTERS].lic
  • %AllUsersProfile%\[SET OF RANDOM CHARACTERS].dll
  • %AllUsersProfile%\[SET OF RANDOM CHARACTERS].exe
  • %UsersProfile%\Desktop\Windows XP Repair.lnk
  • %UsersProfile%\Start Menu\Programs\Windows XP Repair\
  • %UsersProfile%\Start Menu\Programs\Windows XP Repair\Windows XP Repair.lnk
  • %UsersProfile%\Start Menu\Programs\Windows XP Repair\Uninstall Windows XP Repair.lnk
%AllUsersProfile% refers to: C:\ProgramData
%UserProfile% refers to: C:\Users\[User Name]

Registry values:
  • HKEY_CURRENT_USER\Software\Microsoft\Windows\CurrentVersion\Run "[SET OF RANDOM CHARACTERS].exe"
  • HKEY_CURRENT_USER\Software\Microsoft\Windows\CurrentVersion\Run "[SET OF RANDOM CHARACTERS]"
  • HKEY_CURRENT_USER\Software\Microsoft\Windows\CurrentVersion\Policies\Associations "LowRiskFileTypes" = '/{hq:/s`s:/ogn:/uyu:/dyd:/c`u:/bnl:/ble:/sdf:/lrh:/iul:/iulm:/fhg:/clq:/kqf:/`wh:/lqf:/lqdf:/lnw:/lq2:/l2t:/v`w:/rbs:'
  • HKEY_CURRENT_USER\Software\Microsoft\Windows\CurrentVersion\Policies\Attachments "SaveZoneInformation" = '1'
  • HKEY_CURRENT_USER\Software\Microsoft\Internet Explorer\Download "CheckExeSignatures" = 'no'
  • HKEY_CURRENT_USER\Software\Microsoft\Internet Explorer\Main "Use FormSuggest" = 'yes'
Share this information with other people: